
- Introduction
- Visiting in the Winter Time
- Step-by-Step Photos of the Construction Process
- Analysis and Suggestions for Improvement
- A Call for Support
- Additional Resources
A very avid gardener hired Kiko Denzer and Max Edleson to convert an old woodstove into a greenhouse mass heater. The wood stove did a good job of heating the air, but couldn’t retain enough of the heat to keep the greenhouse warm from one winter day to the next. We built a system of channels and mass to contain and absorb sufficient warmth from the stove to keep the greenhouse warm with one or two firings a day. Here’s how:
After exiting the stove, combustion gases make a long detour through the bench. The heat that used to go straight up the chimney now lingers in the bench, which soaks up heat like a sponge soaks up water. A bi-pass damper acts as a valve, so that when you start the fire, gases go straight into the chimney to initiate the draft that will then pull gases thru the horizontal channels.
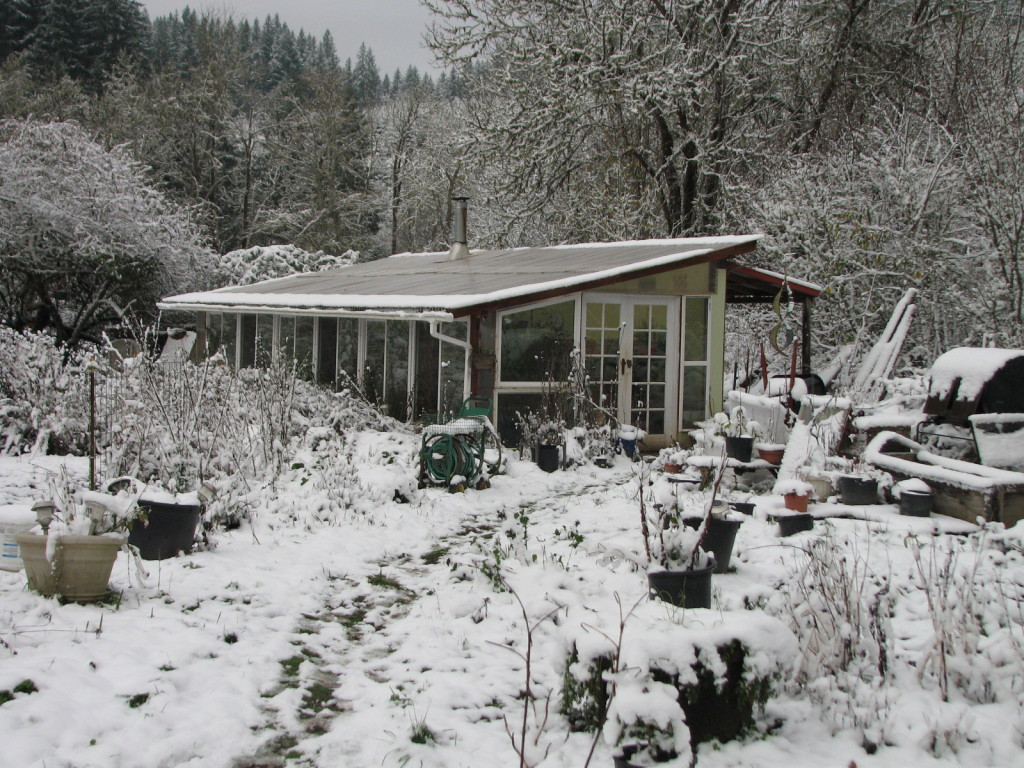
Visiting in the Winter Time
Here’s the greenhouse on a December day in the coast range near Corvallis. Tomato and pepper plants mature in the greenhouse while snow covers the ground outside.


Step-by-Step Construction Photos
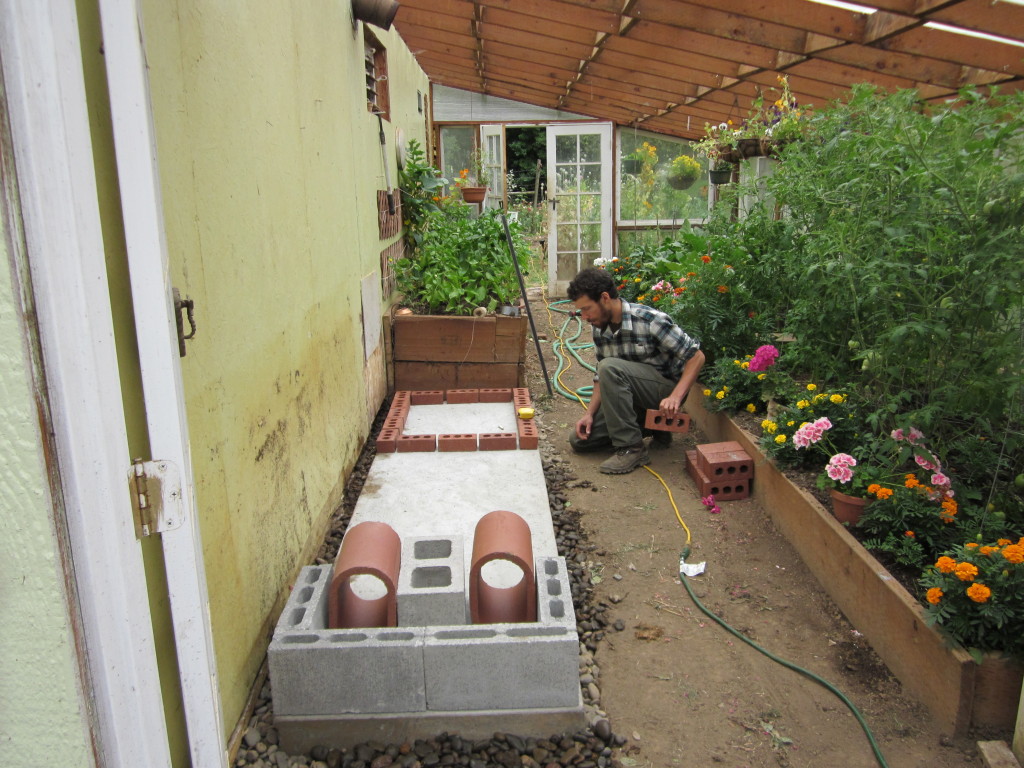
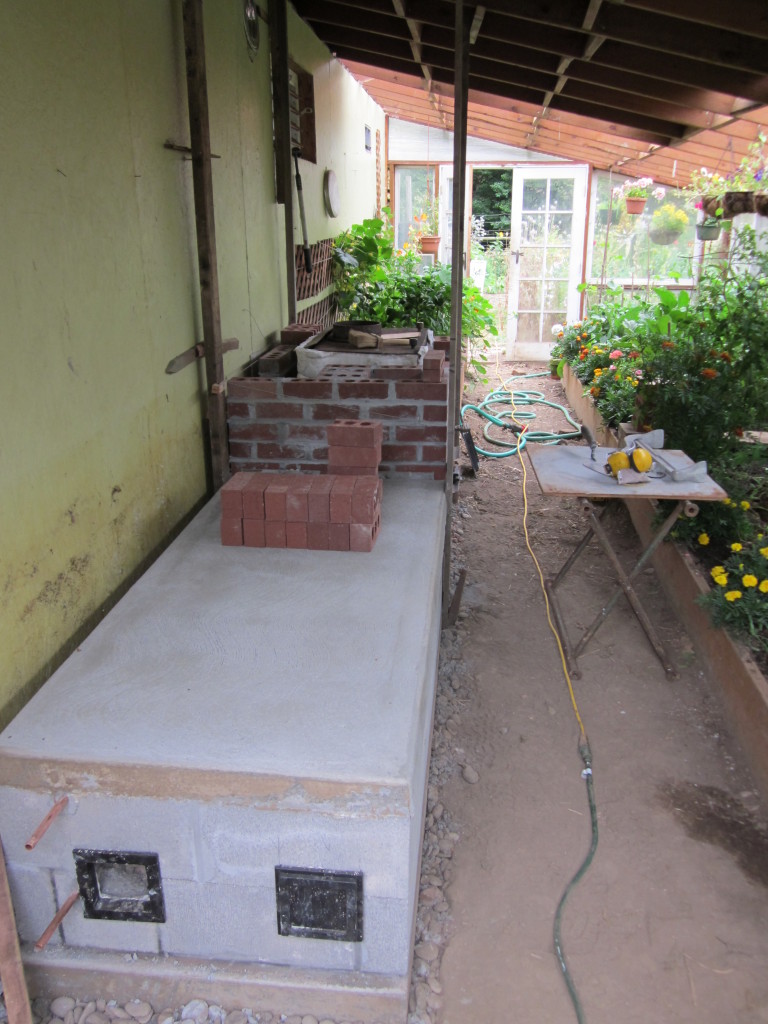
Dry lay-out. We poured the pad to the dimensions Max had carefully drawn out in his plans…but it’s good to check the fit before you mix the mortar.
Kiko installs wooden guides, or “leads”, to help us keep corners plumb and level — very helpful, especially on larger projects.
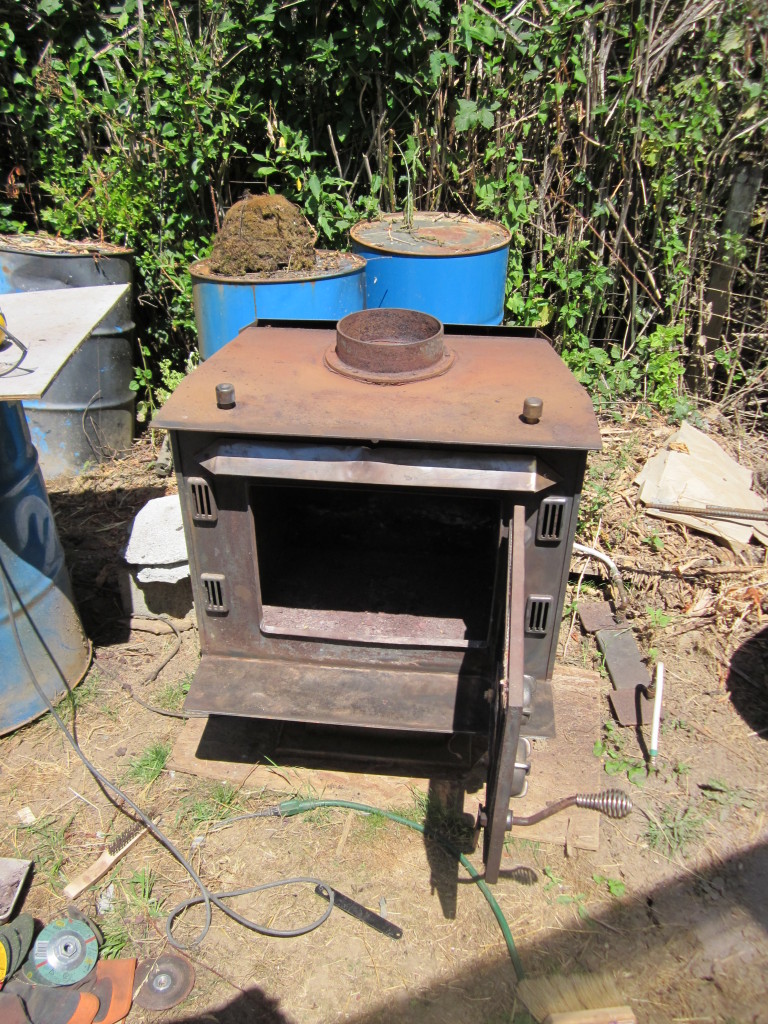
The original wood stove that inspired the project. Max cut out the interior baffle shelf with a 4 1/2″ grinder and metal cutting disk.

First, we laid up as many courses as we could behind the wood stove — hard to reach when the wood stove is in place.
Placing the wood stove/fire box, and examining coursing for the lintel.

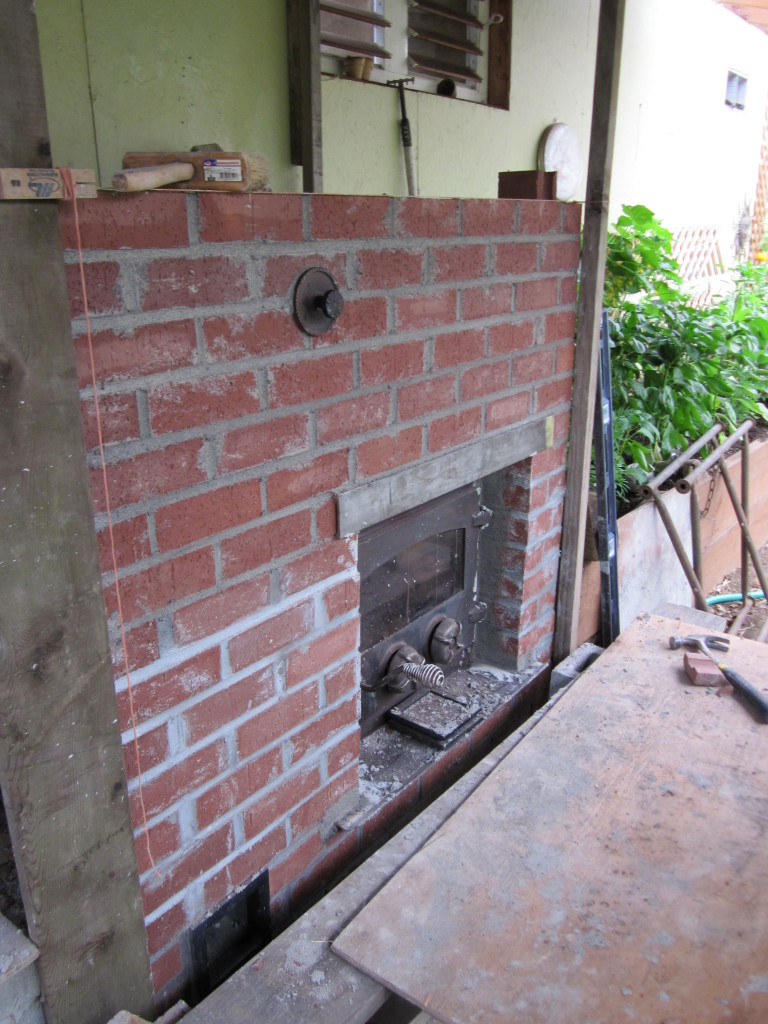
We wrapped the stove in 1″ ceramic wool blanket, which allows the metal to expand and contract within its new brick housing and also maintains higher firebox temps, to insure a clean burn. As we began to fully enclose the stove with brick, we assembled the down and up-draft channels into and out of the bench.
Ceramic wool and brick work surrounding the stove.
The bottom of the downdraft is the place for a cleanout (this is a soot door by Pisla of Finland.
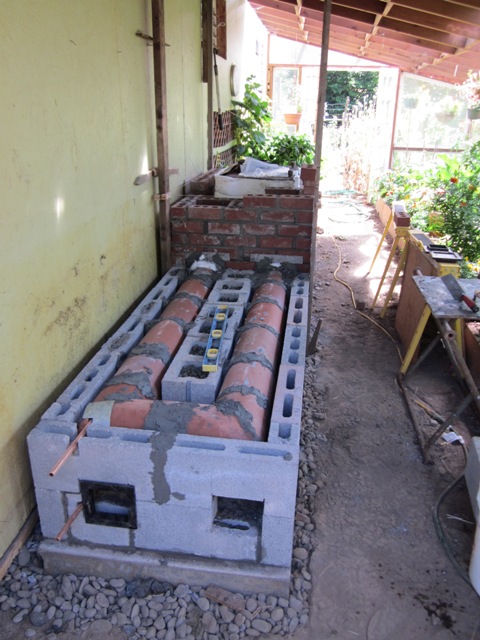
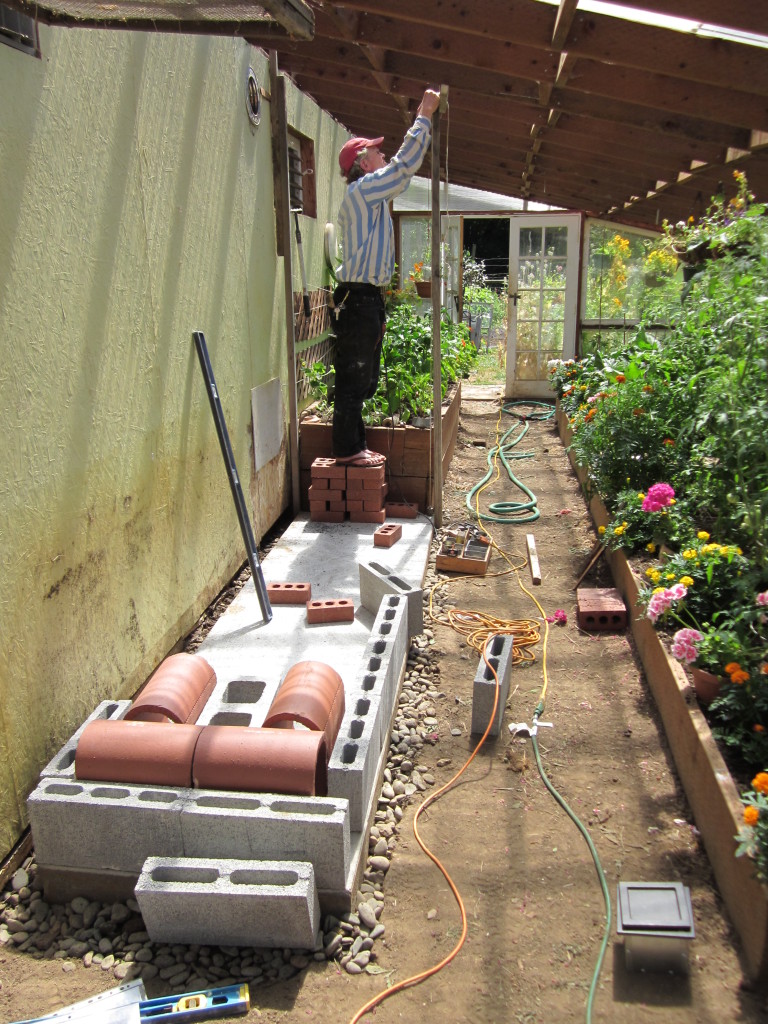
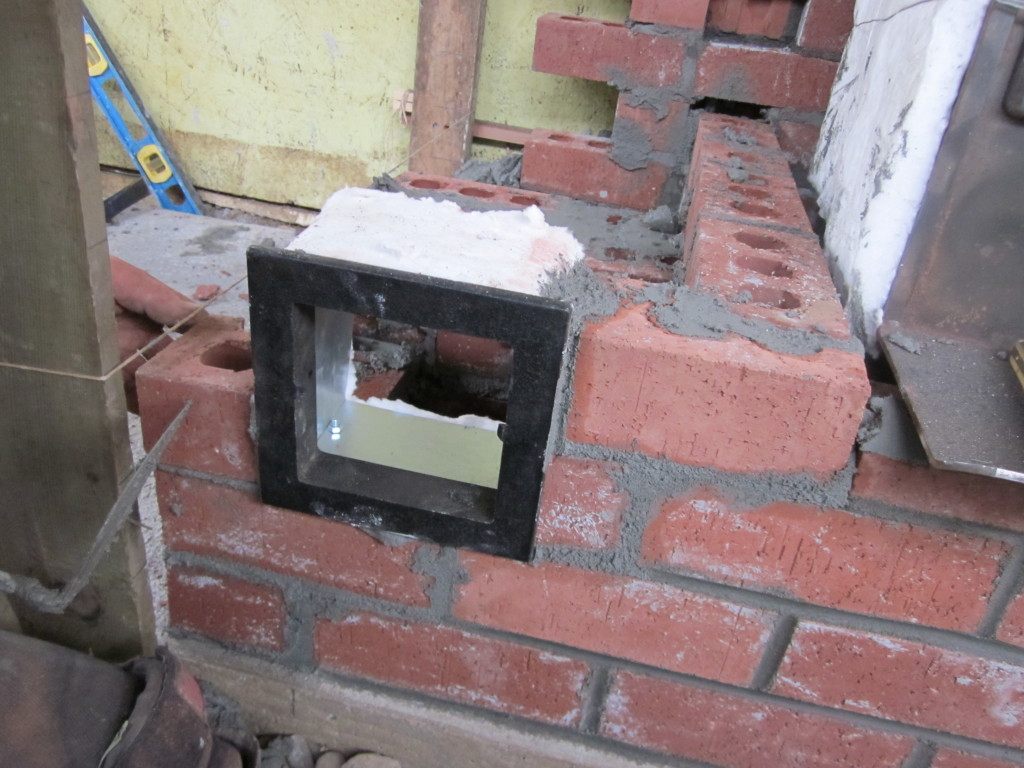
The down and up-draft channels: angle iron lintels span the openings.
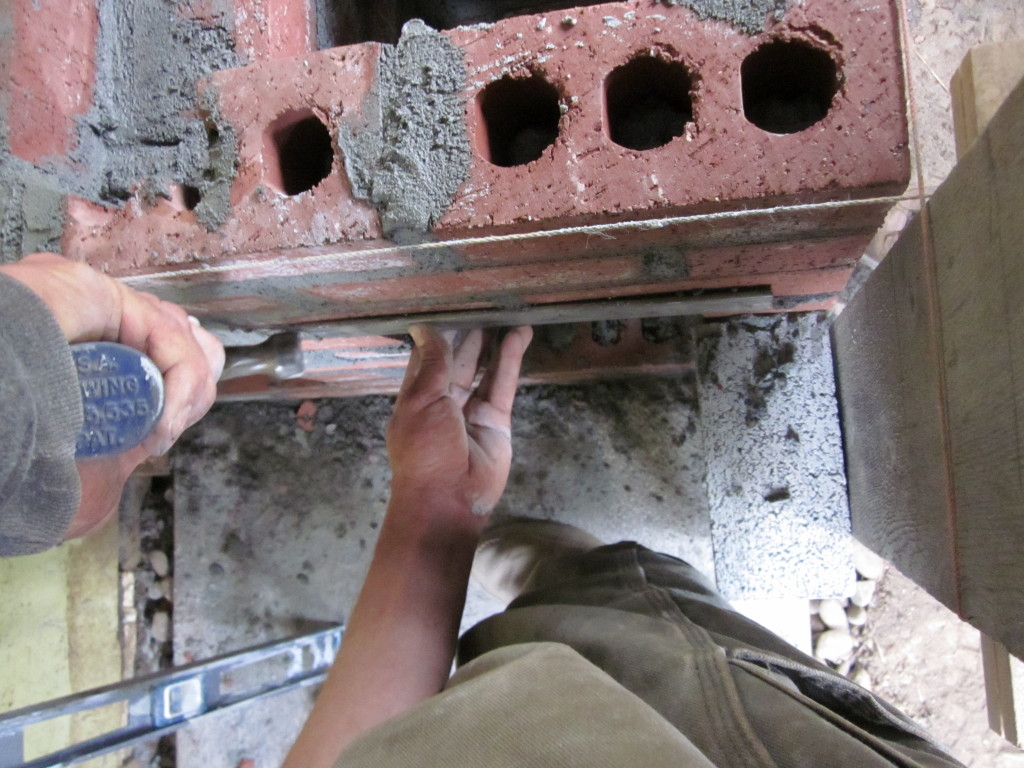
Before the mortar has set up, we knock the lintels back and forth at least a quarter inch so they have room to expand and contract when heated.
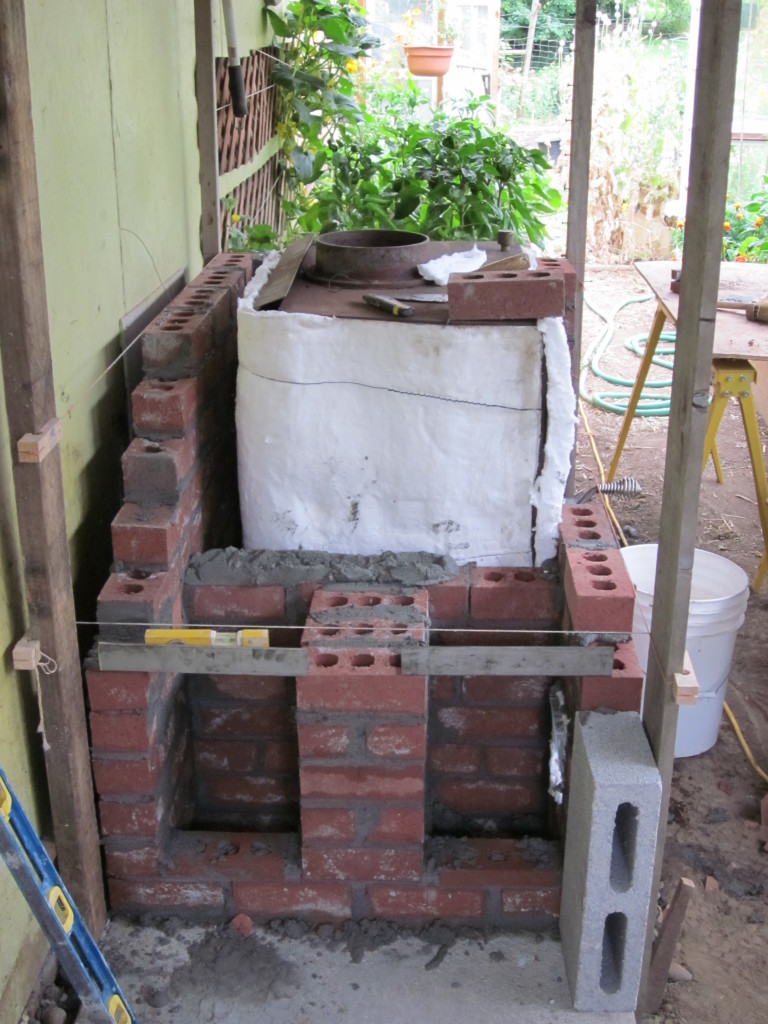
Project coming along. Â We have gotten above the height of the bench so….
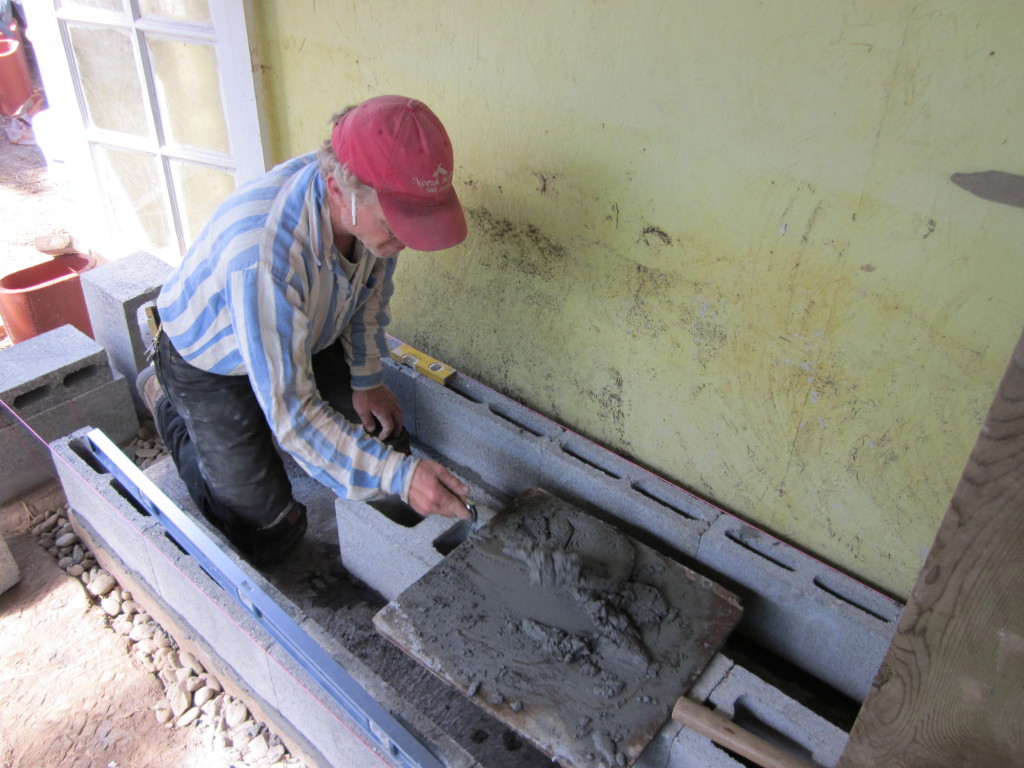
We switch gears and focus on the bench. A rare shot of Kiko using cement mortar! 🙂 The greenhouse experiences occasional flooding so we built the first couple of feet with cement based mortar and made some weep holes in the brick work.
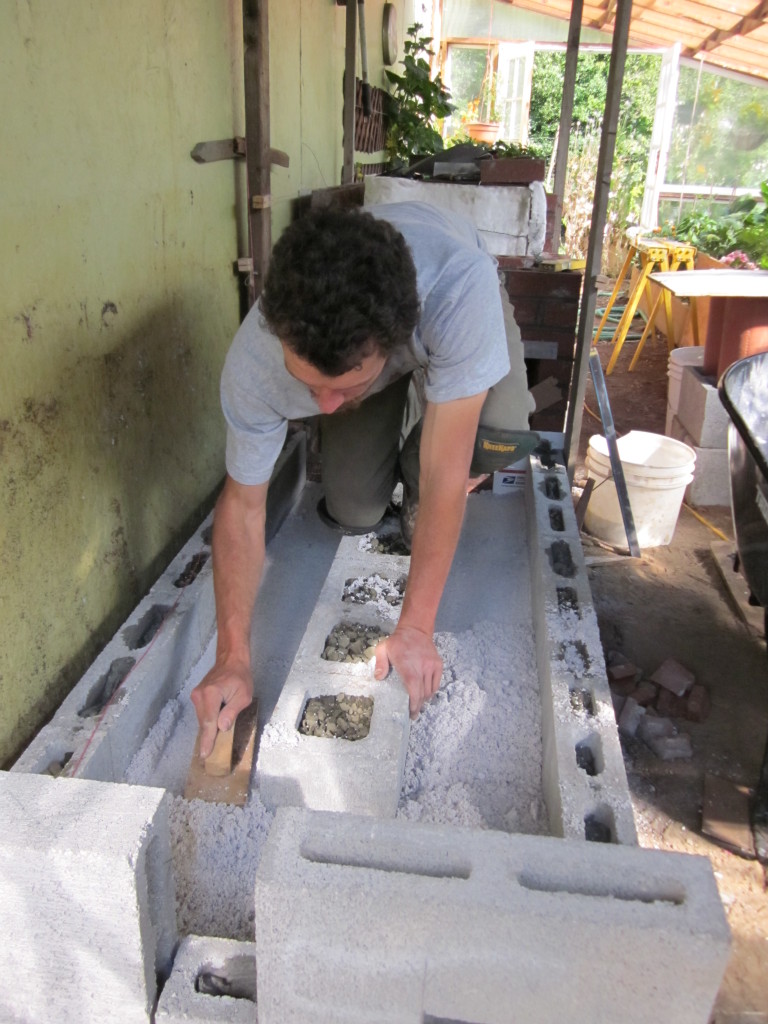
We insulated the bottom of the bench with a perlite-lime mix to maximize heat transfer to the bench top rather than the ground.
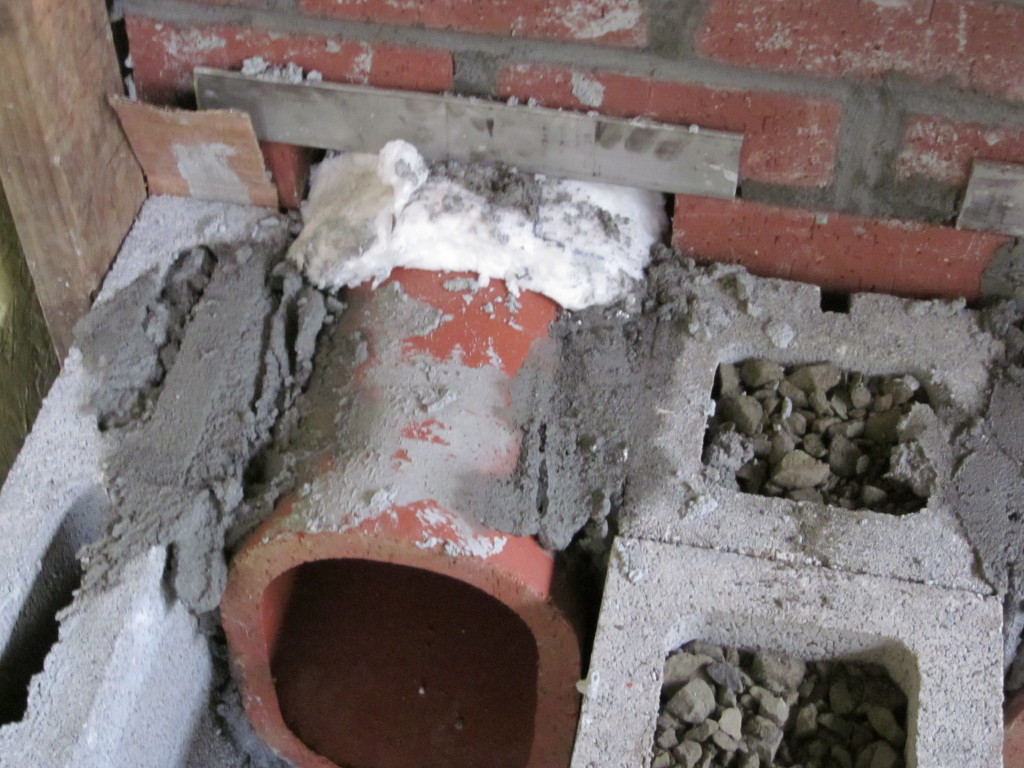
The first flue liner going into the bench. Ceramic wool helps seal the union while giving different materials room to move when heated.
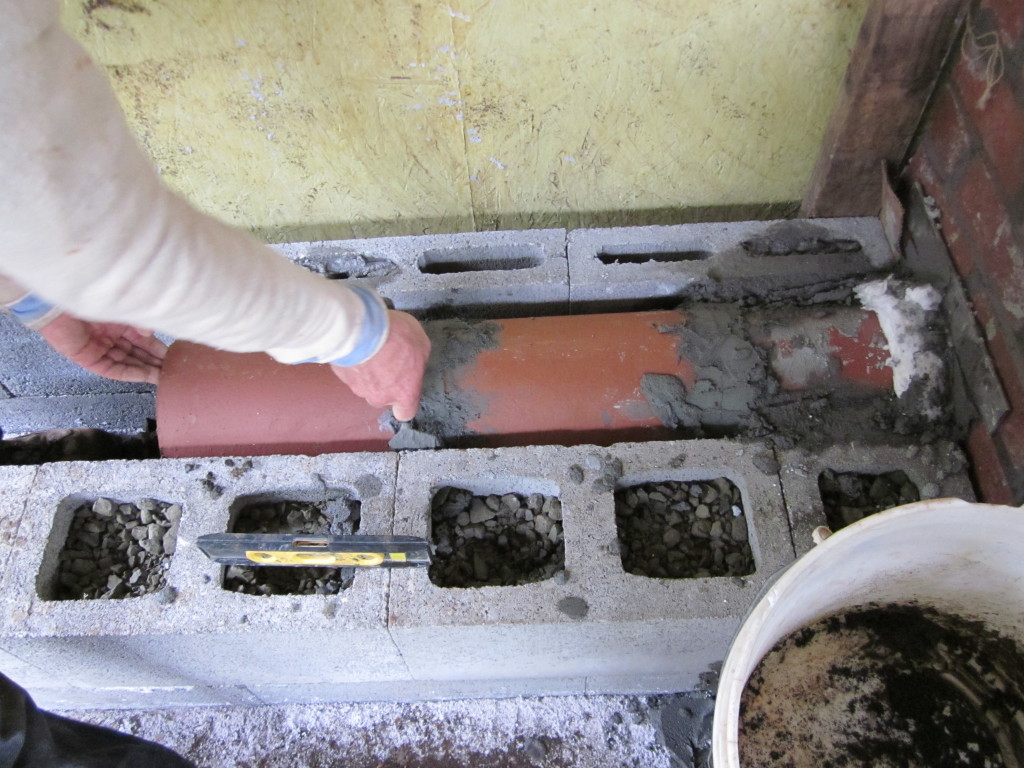
The flue tiles are mortared to each other but not so much to the bench.
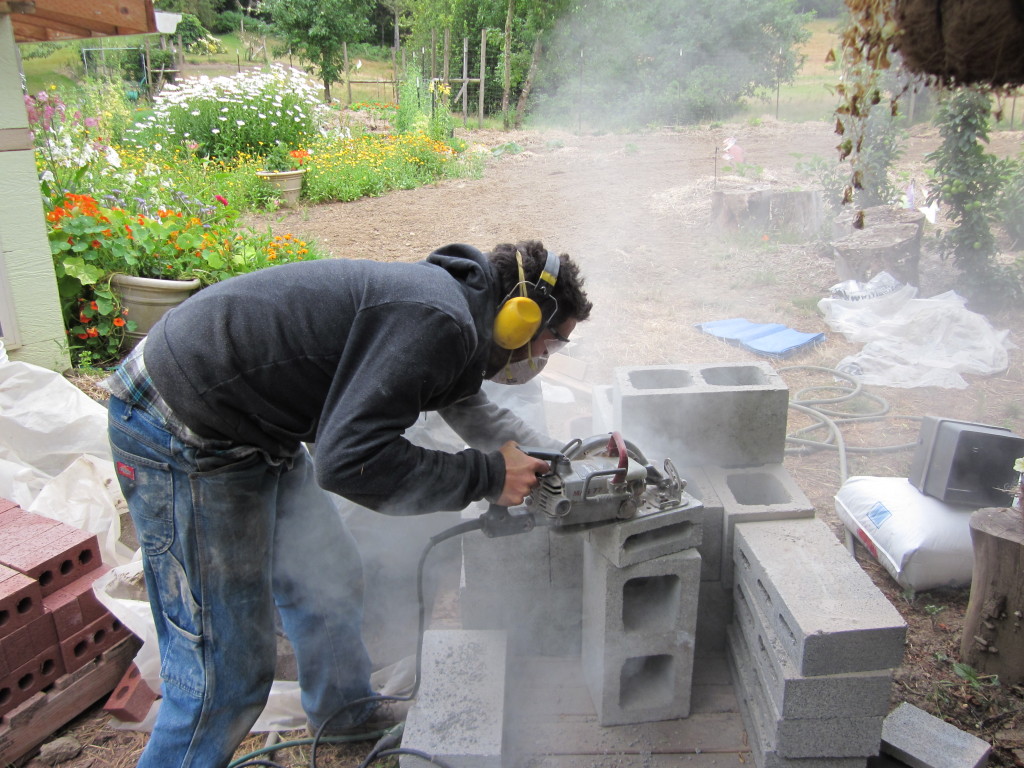
Cutting block with a diamond blade on a skilsaw: dusty and noisy! Wear safety gear. (Better with a wet saw; I’m not sure why we didn’t set it up!)
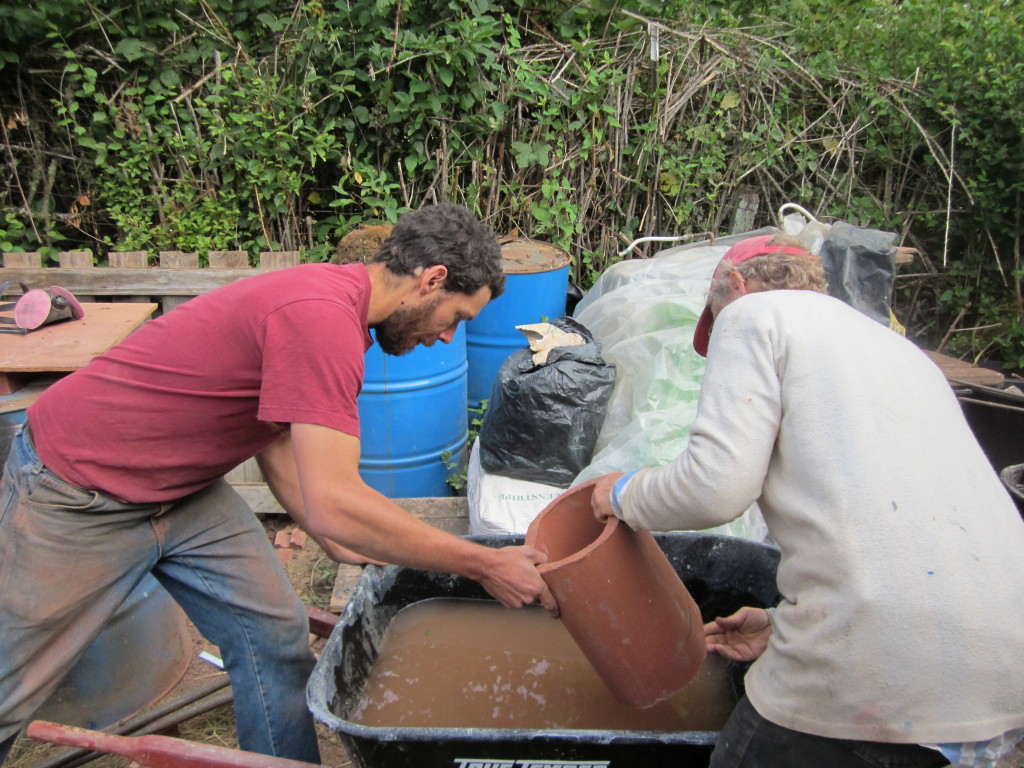
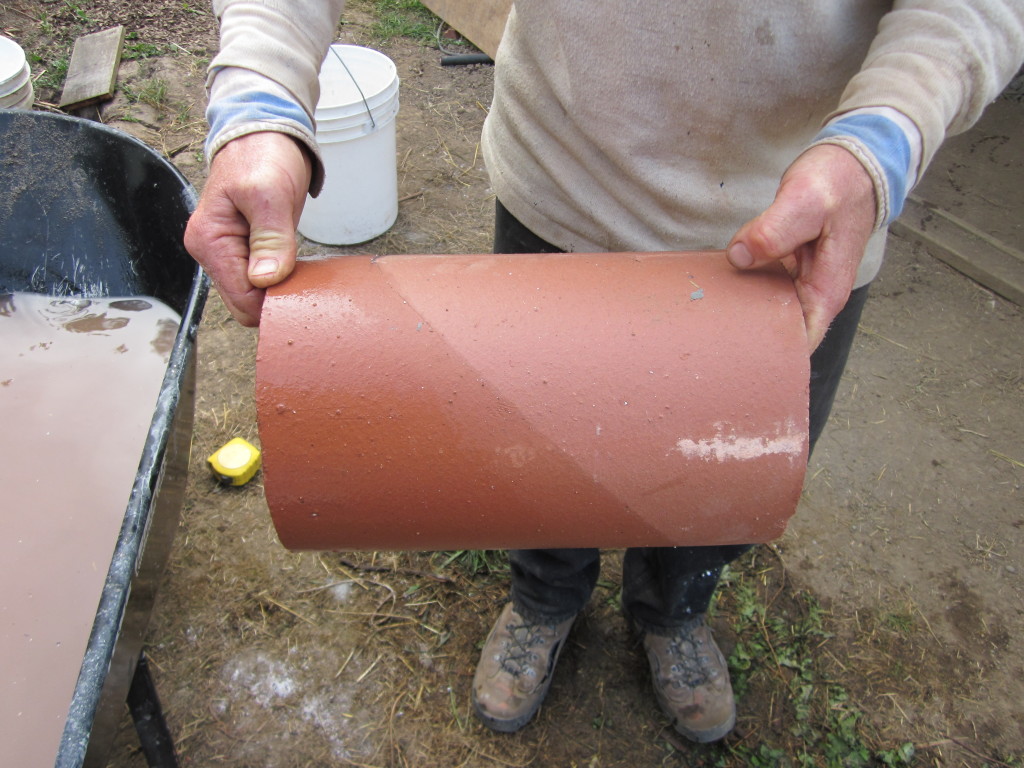
For an angle cut, mark the flue liner by dipping it in water; that gives an accurate mark all the way around a curved shape.
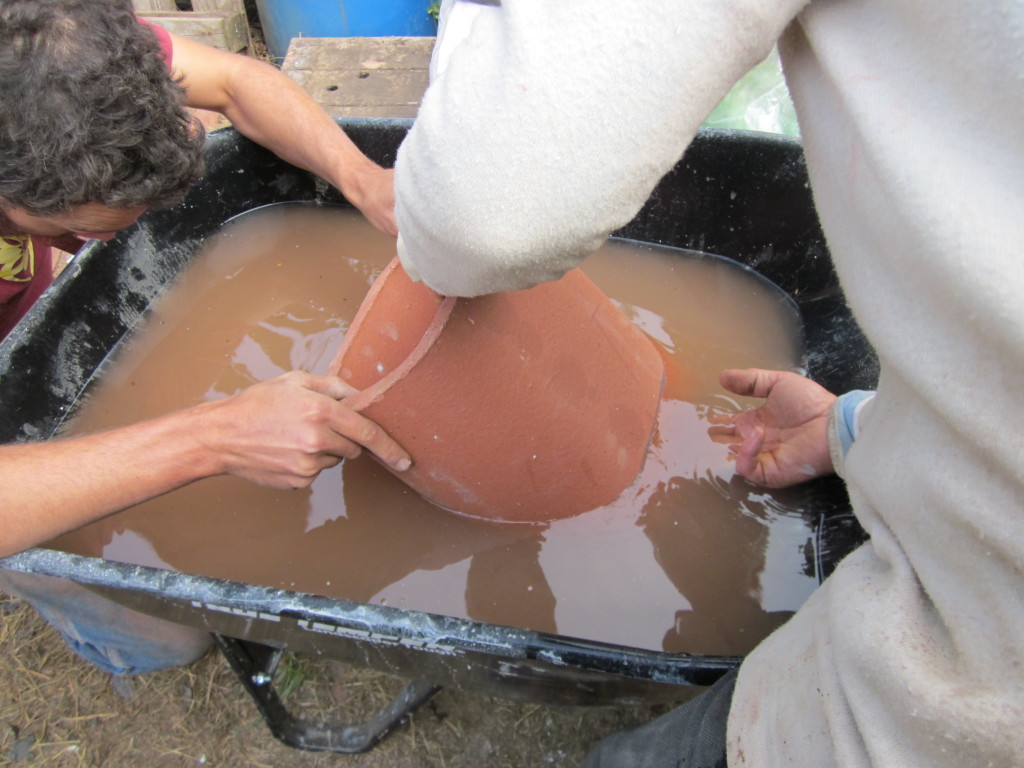
2 pairs of eyes insure we meet our marks on both sides.
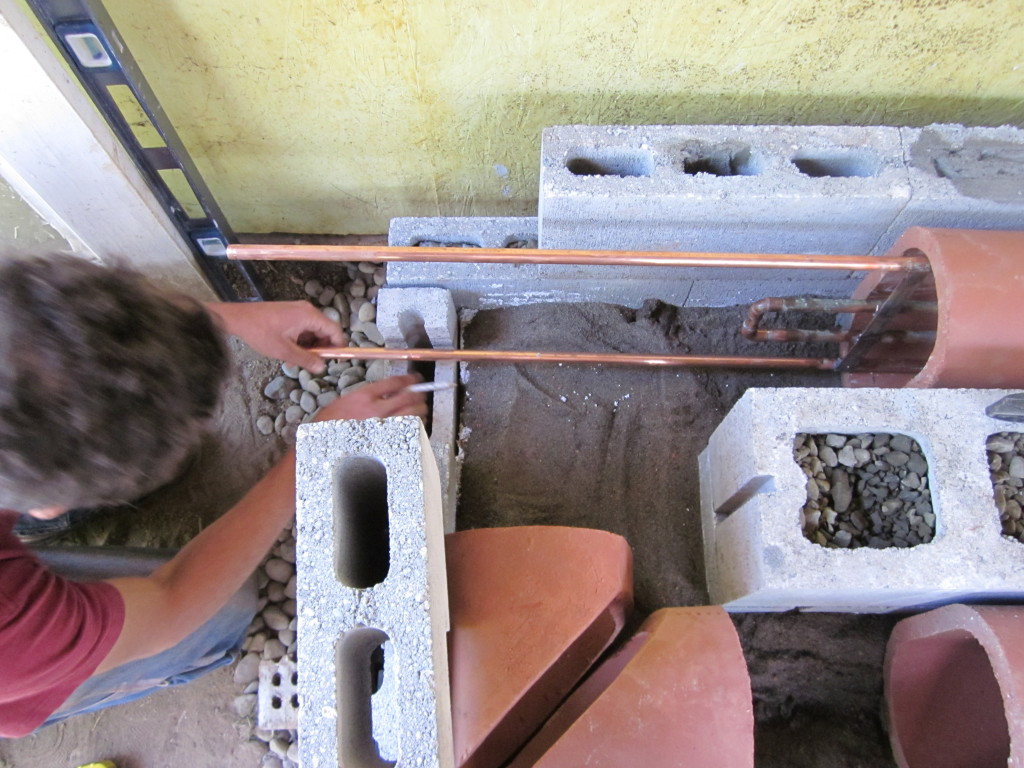
A copper heat exchanger will warm water for watering starts and seedlings.
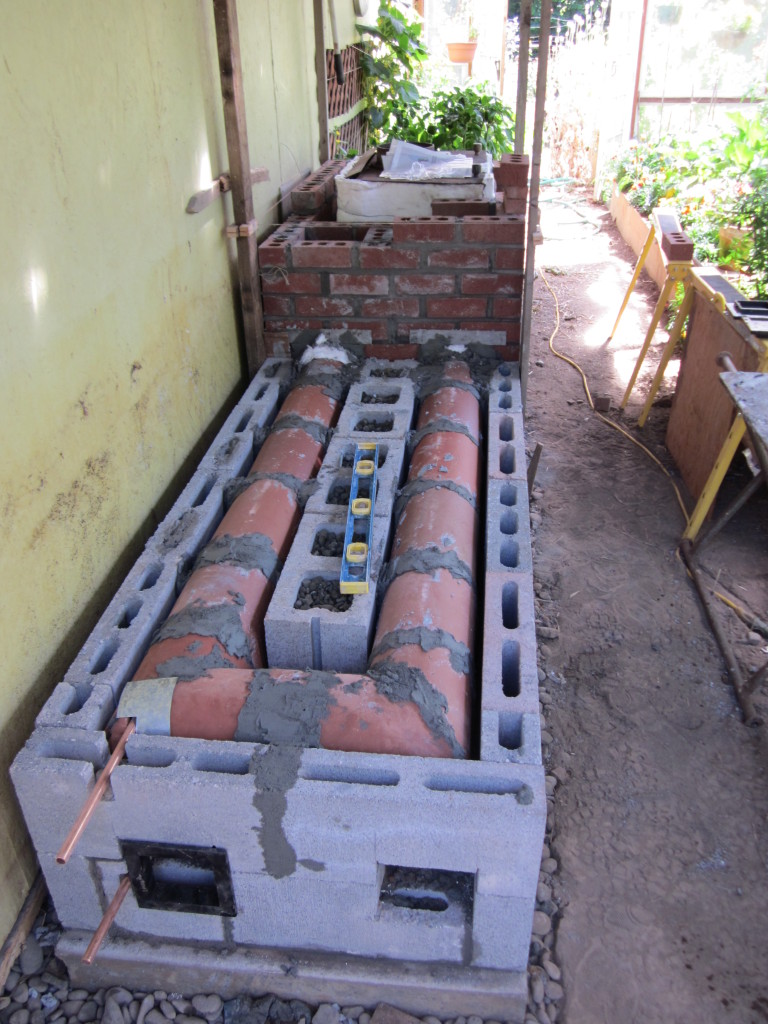
Flue liner assembly done. Cleanouts at end access both horizontal runs.

Framing up and reenforcing the concrete bench top.
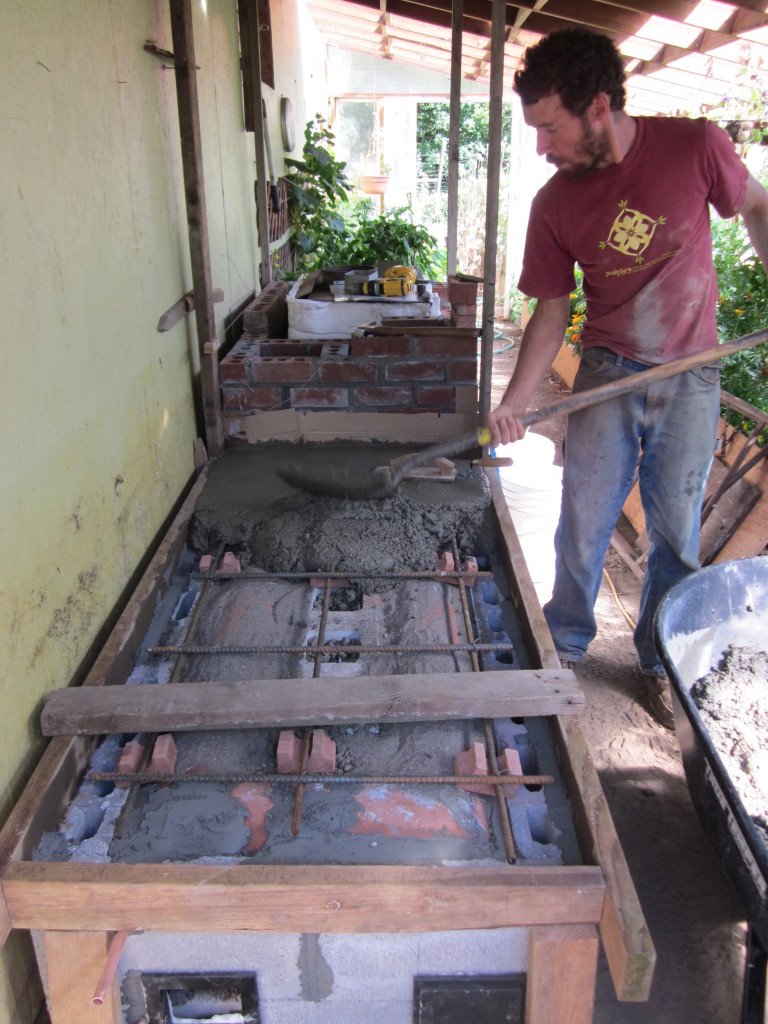
Mixing concrete, shoveling, and screeding.
Bench completed, back to brick work.
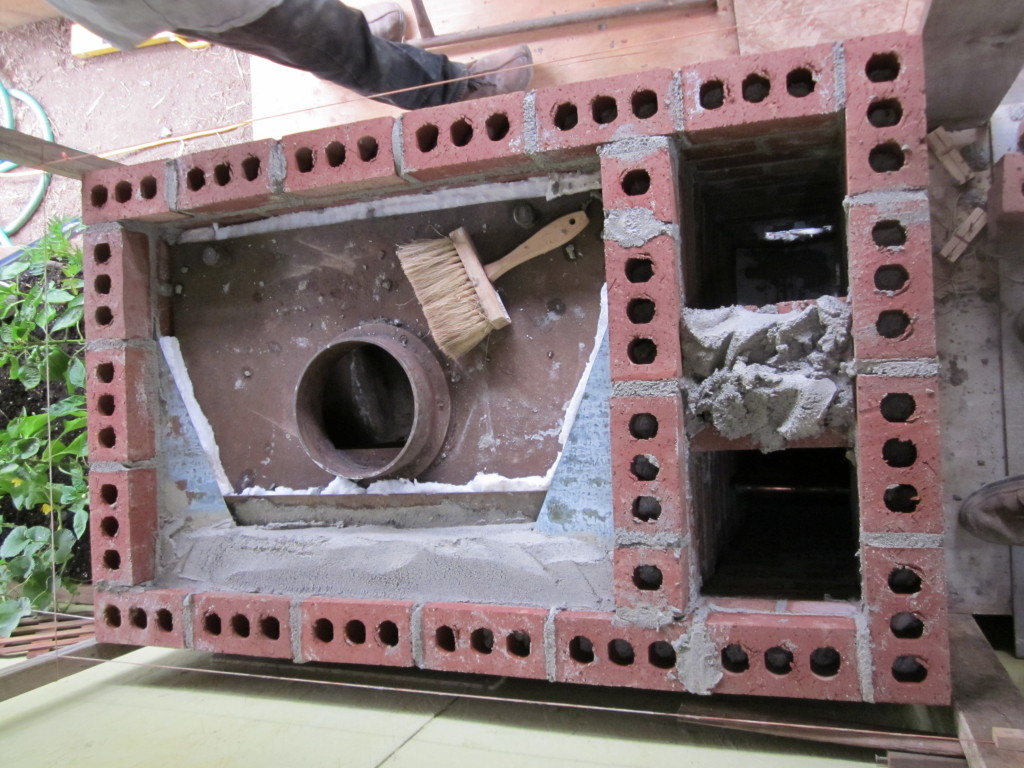
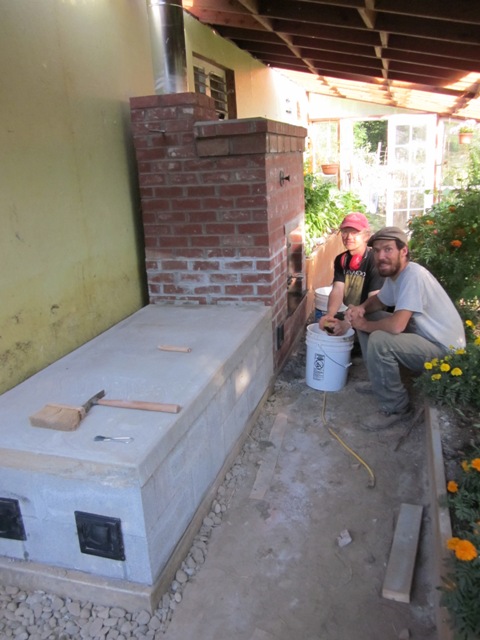
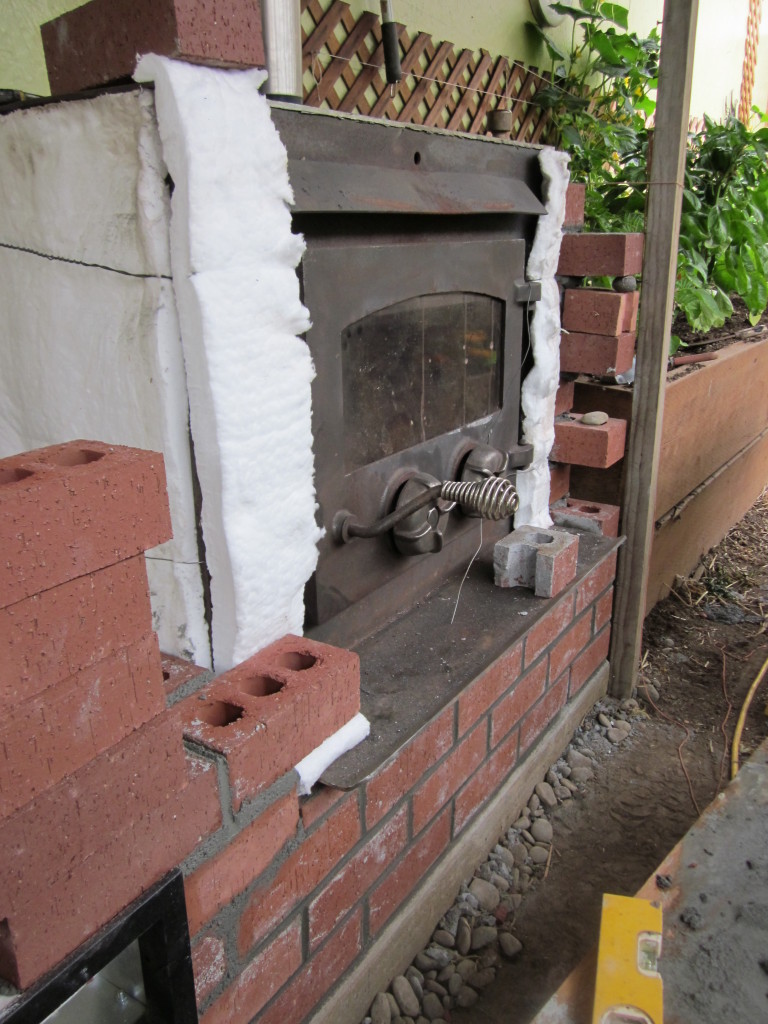
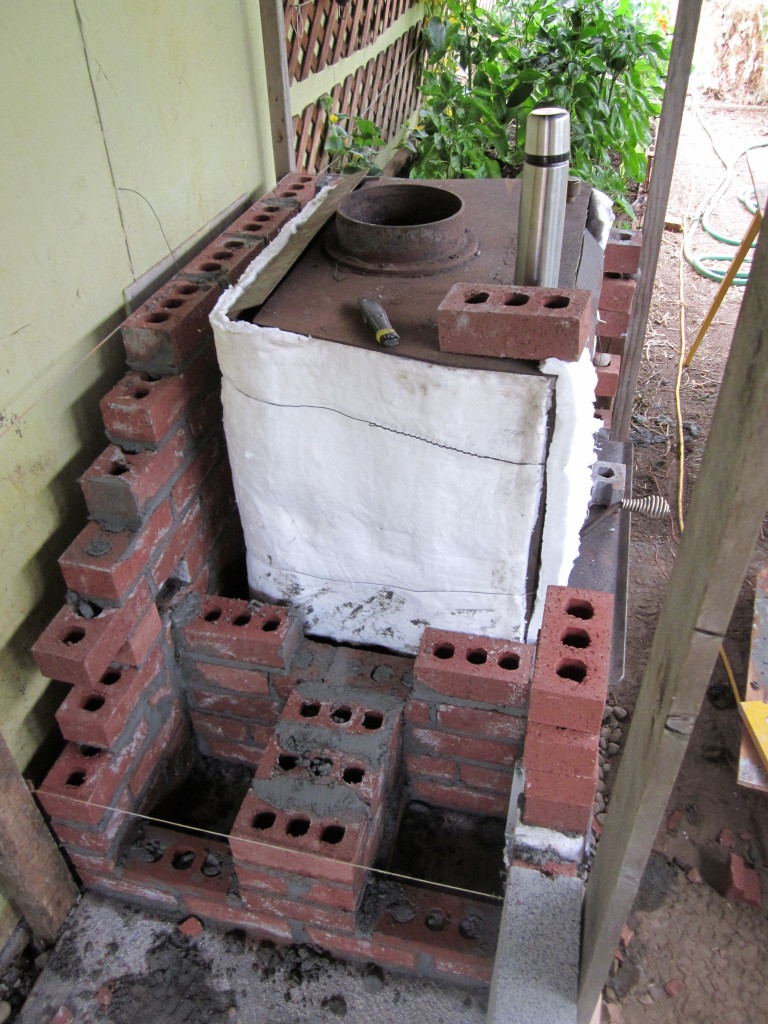
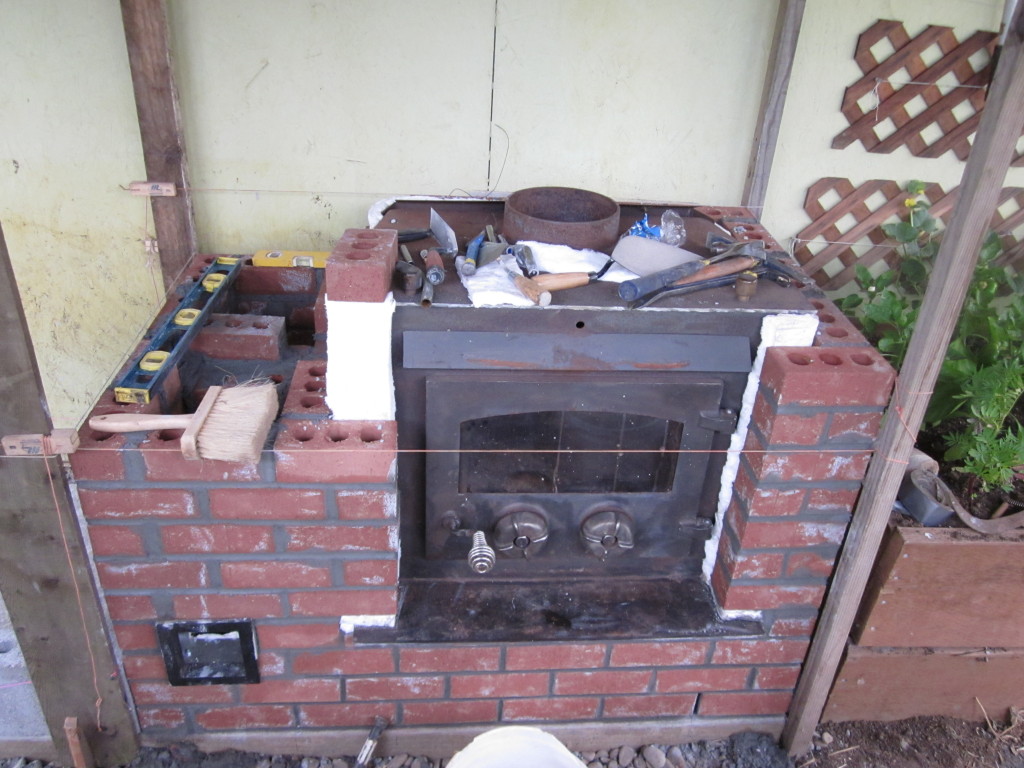
Here you see the firebox and the space for the bell above it, as well as the down and up-draft channels. Max designed the heater around the size of the bricks to minimize cutting and maximize simplicity.
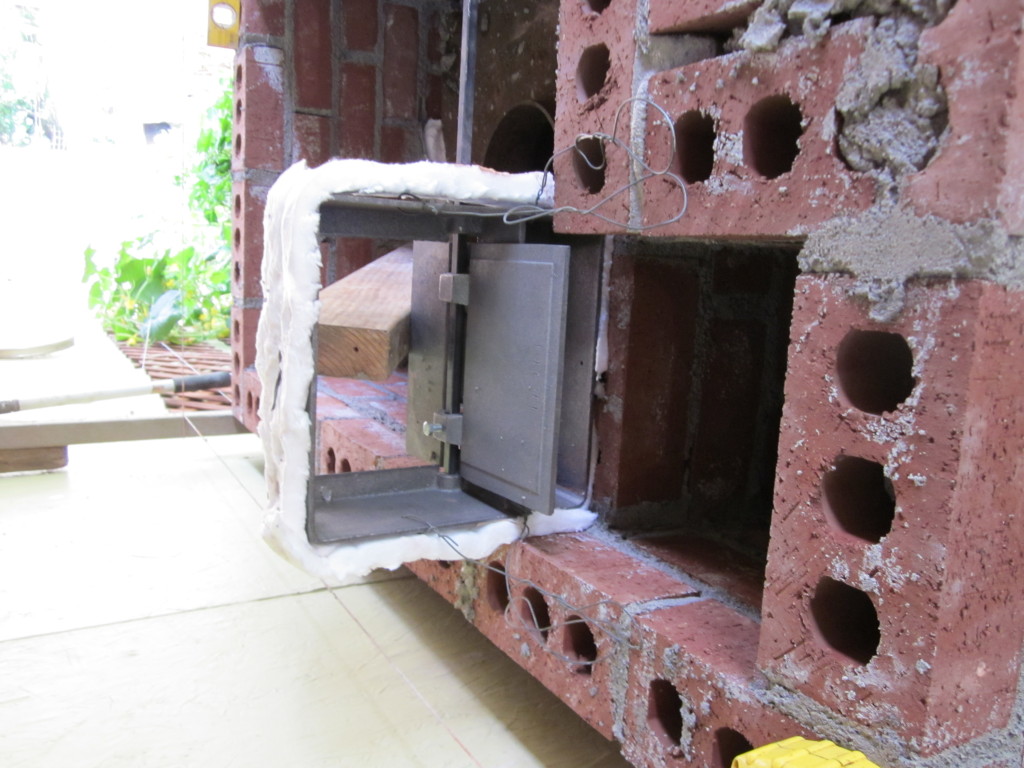
The bi-pass damper: when open, flue gases rise directly into the chimney.
Here you see the front face, and the knob that opens and closes the damper; the bell is the open space to the right of the damper.
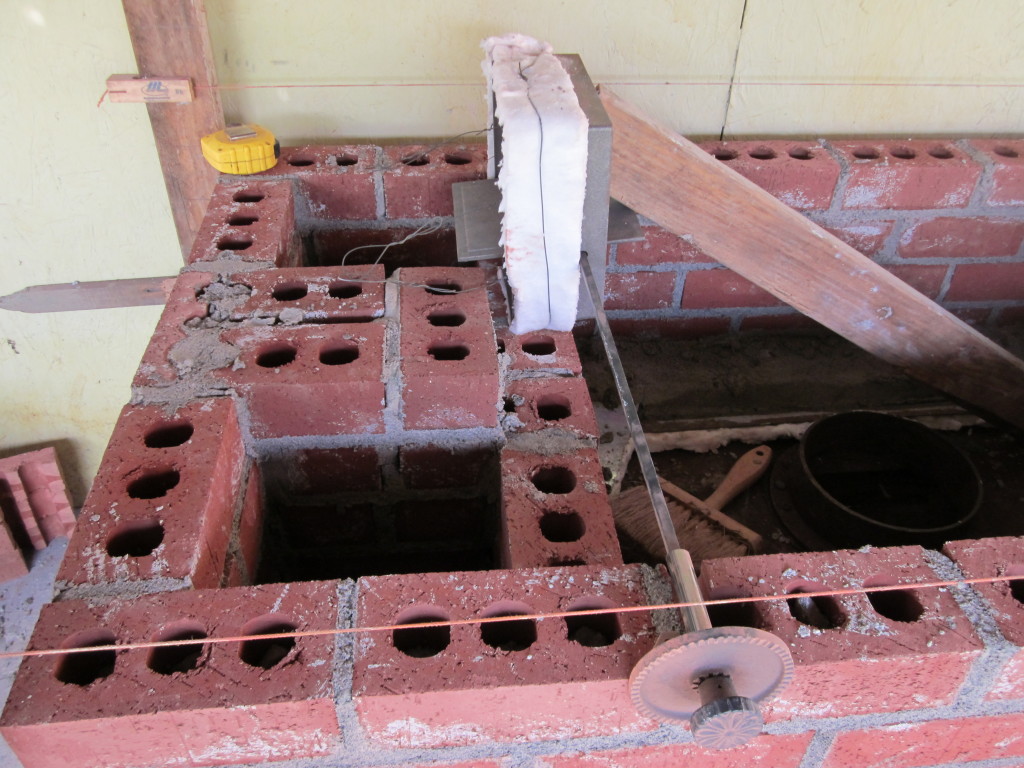
Light grey cement mortar below, darker clay mortar above.
Castable refractory slabs cap off the bell above the firebox and the entrance into the downdraft. The chimney plugs into an anchor plate with a shut-off damper.
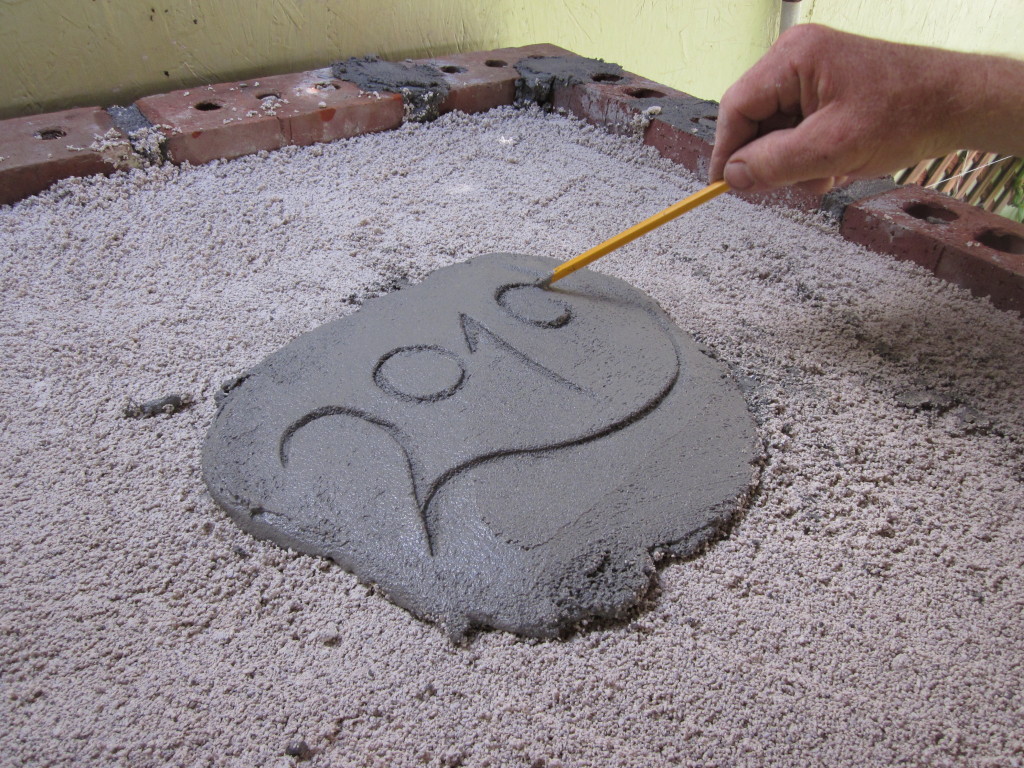
Left-over mortar becomes a plaque to record the year of construction.
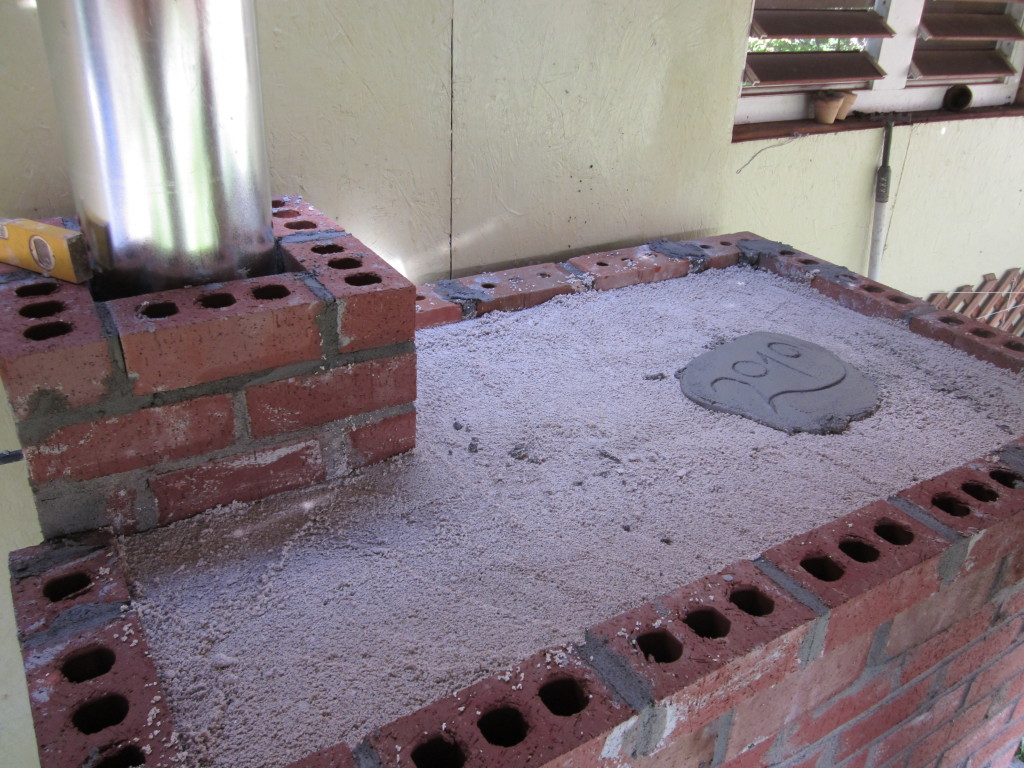
More perlite-lime mix keeps heat from radiating out of the top of the heater, so it can absorb into the mass.
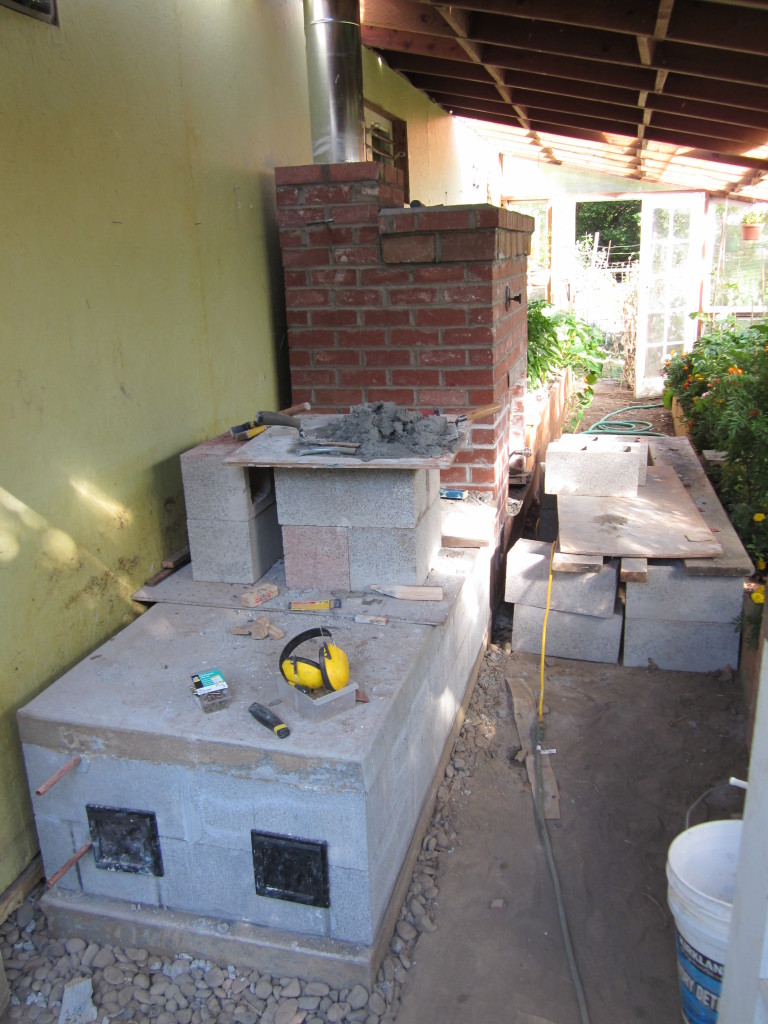
Almost done! The overhanging lips formed by of the top two courses add life to the design by graduating and softening harsh edges.
Analysis and Suggestions for Improvement
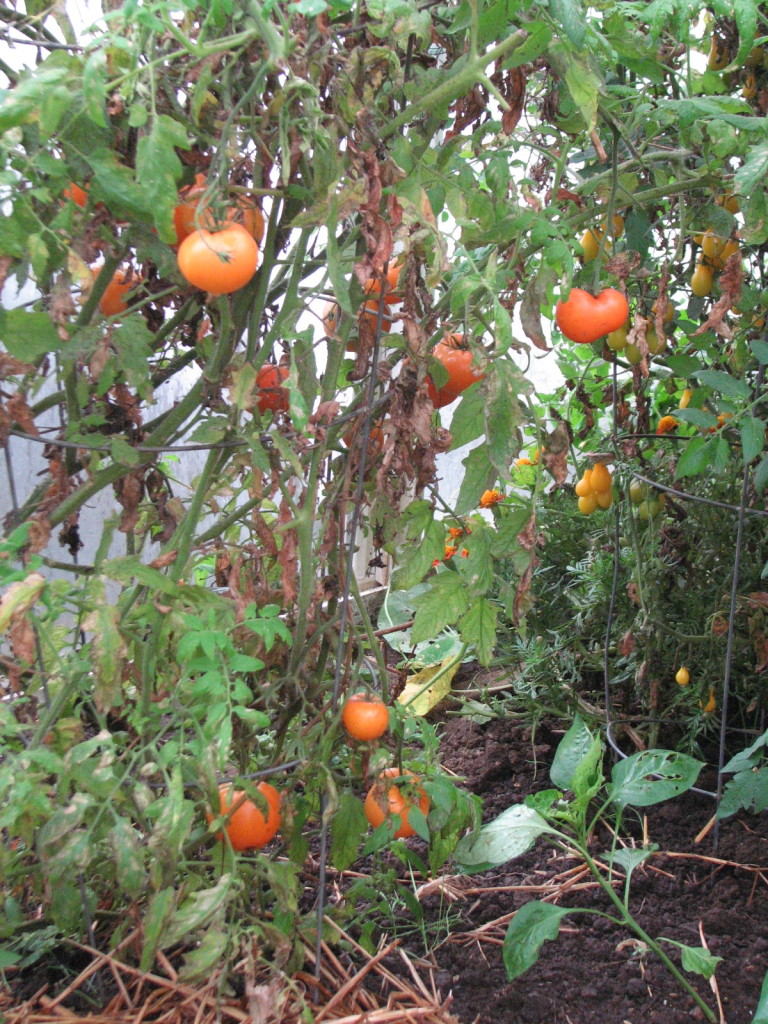
When we went back to visit, Ed was thrilled. Daily firing is work, but it extended the growing season, and gave him a head start in spring. He said seedlings “jumped out of their flats” on the heated bench.
We fired the stove with him and my main reflection was that the original steel stove is probably the biggest limitation. For a batch-style heater of this type, you want a firebox big enough to contain all your fuel for a 24-hour period. In addition to being small, the stove’s firebox would work better if it was higher and included enough throat space so flame and gases to mix thoroughly.
A firebrick firebox and custom door would improve combustion and longevity, which would require greater expertise and increase cost. However, if you’re interested, look at the basic Gymse heater pattern developed by Lars Helbro). This MHA site also shows the basic pattern of a Gymse (but don’t let the downhill draft experiments confuse you).
What about Rocket Mass Heaters for Greenhouses? Tho efficient, the small firebox of a RMH requires more continuous fueling than most folks are likely to be able to do in a greenhouse setting; lack of attention to fuel feed can also increase the potential for smoke backing up. It may be possible to address these issues with the new batch-style rocket mass heater, which is similar to masonry heater design, and featured in the case studies of the 3rd Edition of Rocket Mass Heaters.
Please do let us know of other experiences and online resources.
And make a Contribution to Handprint Press
But only if you feel like it; we’ll work on keeping the info and stories going!
Hi Guys,
Brilliant design and functional beyond what one could imagine. we are presently building a 14′ x 28′ Poly greenhouse. We have been considering a wood stove. Is there a particular technology / brand of stove that would be better choice?
Thanks, Dave – Ontario Canada
not sure if you’re asking about a woodstove to combine with mass, or just a woodstove. If the former, just building a mass heater would probably be cheaper and better. If the latter, see the former!
In this instance, the owner already had the stove, and wanted to use it. As we noted in our analysis, however, “the original steel stove is probably the biggest limitation. For a batch-style heater of this type, you want a firebox big enough to contain all your fuel for a 24-hour period. In addition to being small, the stove’s firebox would work better if it was higher and included enough throat space so flame and gases to mix thoroughly.
“A firebrick firebox and custom door would improve combustion and longevity, which would require greater expertise and increase cost. However, if you’re interested, look at the basic Gymse heater pattern developed by Lars Helbro). This MHA site also shows the basic pattern of a Gymse (but don’t let the downhill draft experiments confuse you).”
Thanks for writing, and let me know if you have more questions!
Hello Kiko, great job! I have a new priti steel stove and would like to use it as a basis for my masonry heater. What isn’t clear from your pictures is the modification to the stove. As well as what you did on the top of the stove and how the heat is sent down to the bench and up the chimney. I could send you a picture of my stove if possible. Thank you for your help it is greatly appreciated
Hey, Elijah, I’m tied up in six different ways here, and there are more experienced masons you could talk to, so for more specific conversation, I’m going to refer you to donkey32.proboards.com/ and the Masonry Heater Association (mha-net.org/). In general, however, I think the most important thing to understand is that heat flows like water, but upside down (Gravity is the motor: hot air rises, cool air sinks, flow varies according to the shape of the path and pressure; in the same way, water flows downhill, cold water sinks, etc.) If you can wrap your mind around the ideas of heat and air flow, the logic of the stove will become more intuitive, and you’ll have the confidence to try things that will match the dynamics of your particular system. Hope this helps…
Yes you would be better off with a larger wood furnace, they have chimney like normal stoves but they have heat exchanger and and hole already made in furnace and fan that connects to a gas furnace ductwork
If you can Find a Kodiac PEDESTAL WOODSTOVE, not sure If they make the anymore? I use to install Woodstoves back in the later 70’s &80’s! The Kodiak PEDESTAL woodstove weighed 645 lbs dry weight with fire brick installed. It was the largest woodstove available at that time that I know of. I would believe it makr a excellent stove for you project!
Personally, I took a older insert woodstove For installi in a firwplace and put a metal Stand under it. So it wasn’t sitt right on the floor. It installed in my garage by the way that’s 30’x35’ with 16’ high ceiling. Big enough to put 3 class a motor homes inside The garage easily!
After I got the woodstove in place, I installed a 18” piece of pipe on the flew and then Cut a hole in the center of a 55 gal metal drum on the side. So the barrel laying on it’s side sitting On the 18” pipe or smoke stack. Another two holes are cut on the opp side of the 55 gal drum where two more 18” pipes foR the smoke stake on top of the first 55 gal met drum.
Another 55 gal metal drum is cut with the two holes and one hole on the opp side just like the fi drum was. Only this time the two holes goes down On the two pipes coming out of the first barrel. The too center hole has a pioe for the smoke stack that conti to the ceiling And goes into a support box. From that point teiple wall exterior pipe goes from inside the support box and out thru the roof with a chimney cap.
If you can PICTURE this? There the woodstove with two 55 gal metal drums as part of the chimney. The insert has no baffle, so flames and smoke goes Into the center of the first barrel and the flames and smoke then split to both sides inside the barrel to go up the other two chimney pipes and into the sec 55 gal metal drum where the smoke now is coming up on the far sides of the second barrel and smoke then has to go back to the center of the top barrel to go on out thru the roof.
Being the woodst a insert for a fireplace. The stove itse is double walls on the sides and back and half the top where the stove is desi to have a air blower to blow the heat out the chambers in the front of the stove. So the stove does get hot at all unl you have a blower on to force the heat out thru the stove’s chMbers. I don use a blower at all, instead the barr collect all the heat and get incredibly hot very quickly! Especially the bottom barrel! Takes longer for the top barrel TO get hot. By the time smoke gets thru both barrels The smoke has cooled considerably! Gasses must be burning pretty efficently since you don’t see any smoke coming out the chimney cap except for the distortion from the heat hitting the outside air!
This set up really heats my building/Garage in a hurry! But I wouldn’t say it contains the heat in the barrels for long once the fire dies down in the woodstove. Fortunately I don’t need my garage warm 24 hours Everyday! Otherwise I would have to come up with a better plan like you to absorb the heat and hold the heat in the buil longer! I will keep your Idea in mind when I build my greenhouse In the future! Beicking in my barrels like a chimney anove my woodstove just might do the trick too?
So grateful for this article. I was looking specifically for a way to heat a greenhouse and water through winter. Your article really answered all those questions. Here’s another: If I have an attached Walipini/greenhouse can a rocket mass be shared for heat and hot water? Or two separate heating systems?
Thanks, Jacqueline, glad you found your way here. Have you discovered the rocket stoves experimenter’s corner at donkey32proboards.com? There’s a lot of knowledge, info, and advice there. Heating water is definitely do-able, but can be tricky — and dangerous, if it’s a closed/sealed system. Shared or separate depends on your needs and heater design, etc. Good luck! I’d be interested to hear more about what you decide to do…
Hey there,
I’m curious to see if your solid mass heater/ fireplace is still working. Or, if not, how long did it last? Was it as efficient as expected? Were there glitches? Would you change anything if you had the chance to build a new one?
Let me kbow.
Thx. =]- Meeschko
Hi, Michel, last I heard (a year or two ago?), the owner was gardening so much less that the greenhouse didn’t warrant heating. Aside from that, I think the heater did a good job — ripe tomatoes for Christmas (see here). Changes, hmmm. Hard to say. Depends on so many variables. The client had an old stove and wanted to use it. It made some parts of the build easier, some harder. Did it save the client any money? Short-term, yes. Long term, maybe not. There’s no such thing as perfect. (Or, if you look up the etymology of the word, you’ll find that it just means “thoroughly made” — which is what it’ll be when you’re done.)
I am looking for details about your product place lave me a message.whenI post this, I am looking for more information on this.
for more info, please go to firespeaking dot com
Very cool, Thanks for sharing.
I wonder how an auto feeding pellet stove could be used for one of these. That would eliminate the daily firing up the stove. the thermostat would be the trick because of the delay in heat transfer. It might over heat waiting for the thermostat to register ambient temps.
But a ton of pellets is pretty cheap and easy, cleaner than handing wood. no hauling wood every day.
Thanks again for posting this! you guys are awesome!
Pellets are made for producing smoke, not heat. They will produce heat, but much lower than wood. If you don’t want to bother with wood, want easy to use and cheap maybe a propane heater is for you.
I am wondering if there is any problem with pouring the concrete directly on top of the clay flue liners? Seems like you would need to break the bond so they could expand and contract at different rates? But I really like the idea.
Do you think there would be any problem with forming the sides and pouring concrete for the sides and top at the same time? I think this would be a great way to make a bench.
I have always been concerned that rocket mass heaters would have poor chimney draw giving a possible smoky room – at least before the stove heats up. Your damper seems to address the issue wonderfully: do you have a supplier of same?? Thanks in advance.
Hey Brian, I have been working for several years to develop and now have available a bi-pass damper for rocket mass heater, masonry cookstoves and masonry heaters. Follow the link to check it out.
Great idea guys…
I don’t have such inclement weather that would require constant heat provided to a greenhouse (although I would love to do it), but could, as Angela said, use it to heat up a varanda in the winter or make it a heated bench for the varanda (love the idea).
Question: what is the surface temperature on the bench area?
Thanks. great job!
Rom
surface temps depend on how much and how long you fire the stove. If you over-fire, yuou can get benches hot enough to be dangerous.
It also depends on how much mas you surround your channels or bell with. The thicker the mass, the lower the surface temperatures.
Dear Sirs,
I was wondering, given you’ve utilised a bell chamber (as per the free-gas-movement type school of thought), why then change to a channel based system in the bench? Is there an advantage to this that is not obvious to the layman like myself. Intuitively it would seem easier to construct another low bell using piers, much like a Roman hypocaust. What am I missing?
Your sincerely,
Ben.
We weren’t so versed in the bell design approach at the time. That said, flue liners are still a great way to create channels and generate heat exchange. I have found that bells and channels can work together.
Just wondering what this cost?
Hello from Scotland. Thank you for your excellent article. I’m always on the hunt for ways of solving our heating problems. I’m not two big young men, rather a smallish not so young woman. I’ve seen mass stoves before but not quite understood the principle. I think I can adapt your designs to build something in my veranda. We’re living in a static caravan at the moment, and every winter I threaten to get the stove sorted. It’s a confidence thing and also a resources thing, ( never have the cash). Now I know what to collect to make a thermal bench, the new old stove we’ve been lent, has a flue rather than a chimney, and will go through the side wall, and I can build the bench on the outside and heat the veranda, a warm seat and a drying room too, sorted, Angela.